Modeling Meiosis
What’s special about sex cells? Figure out how they’re made (in a process called meiosis), and learn why it matters.
- Meiosis images (printed on separate sheets of paper or projected one at a time)
- Envelope or folder, to fit images
- Markers
- Optional: chart paper (not shown)

Place the images in order (1, 2a, 2b, 3) and put them in the envelope or folder.
You will see four different images, each showing a starting cell and four sex cells (eggs or sperm) generated from the starting cell through meiosis. All four images are correct, but they represent the starting and ending points differently. Look at the images in order, one at a time as described below (the envelope will keep you from peeking).
Start with Meiosis Image #1. Each circle represents a cell, and the lines in each cell represent chromosomes, which are made of DNA. Compare the starting cell to the sex cells. What’s the same and what’s different?
Think about what events could have created these sex cells from the starting cell. Draw diagrams showing at least two different ways that the sex cells could have been made from the starting cell. Your drawing will be a model of meiosis, the cell division process that produces sperm and eggs. Scientists make models to help them understand a process and ask questions about it.
When drawing your model, assume the following:
The chromosomes can be replicated, or copied (see illustration below).

The cells can divide, making two new cells that contain chromosomes from the dividing cell (see illustration below).
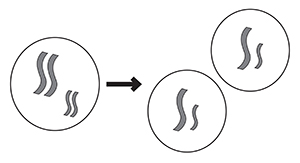
When drawing your models, show the steps of replication and cell division separately. Label the steps.
Now look at Meiosis Images #2a and 2b. These are two different representations of the same process as the first image, but color has been added to distinguish between the chromosomes you inherit from each of your parents. Compare the starting cell to the sex cells. What’s the same and what’s different?
Take your models for Image #1, and see if you can add color to make them work for both Images #2a and #2b. Or redraw your models. If possible, draw at least two different ways that the sex cells could have been made from the starting cell.
Now look at Image #3. What’s different about this one? Do you notice any relationships between the chromosomes in the different sex cells? How might these chromosomes have been produced? You might need to add a new assumption about what can happen during meiosis.
Looking at your models for Image #3, think about which step could have produced these chromosomes, and how. Does this new evidence rule out either of your previous models? Revise or redraw your models so they fit with this new scenario. Be sure to show what could have happened to create chromosomes of two different colors.
Each cell in your body contains two slightly different versions, or homologs, of the 23 human chromosomes. Your two biological parents each gave you one homolog of every chromosome. In the models, the two homologs are represented by different colors: blue chromosomes were inherited from one parent, and yellow chromosomes from the other parent. Both homologs are exactly the same size, carry the same genes, and are nearly identical, but contain small differences in their DNA sequences. The cell division process that produces sperm and eggs, each with one homolog, is called meiosis.
By drawing a model based on Image #1, you showed how meiosis can deliver one homolog of each chromosome into each sex cell, so that each sex cell has half as many chromosomes as the starting cell. In drawing models based on Images #2a and #2b, you showed how the chromosomal homologs from the two parents (blue and yellow) could be randomly sorted, so a sex cell would have a mixture of chromosomes from the two parents. This is called independent assortment. In your last model, you showed how maternal and paternal homologs trade bits and pieces of DNA before the final cell division.
To fit with the sex cells shown in Image #3, your model should show that the starting cell first replicates (copies) its chromosomes (step 2 in the diagram below), then undergoes two rounds of cell division (steps 5 and 6). After replication, there should be two copies of each pair of homologs (a total of four copies of each chromosome). These four homologous chromosomes are called a tetrad, and each pair is joined together to form an X shape. Next, the cell divides, giving each sex cell two copies of each chromosome. Finally, a second cell division produces four sex cells with one copy of each chromosome (click to enlarge image below).

In drawing your models, you probably figured out that the steps must happen in this order, because in order for the copied chromosomes to exchange pieces of DNA (step 3), they all must be together in the same cell. The process of exchanging DNA between chromosomes is called recombination or crossing over. It happens during every meiosis and throughout almost every chromosome. (The exception is the X and Y chromosomes—they mostly don't recombine.)
All of these intricate steps result in sex cells that each contain a unique combination of chromosomes and DNA sequences—each sperm or egg is different from every other. And due to recombination, a child inherits chromosomes that are not just copies of the parents’ chromosomes, but unique versions of those chromosomes. So each child has a unique combination of alleles—the versions of the genes that influence genetic traits. This helps maintain the diversity of the human species.
From an evolutionary perspective, meiosis makes it possible for helpful alleles and harmful alleles to be inherited separately by different individuals. Over time, as a result of natural selection, helpful alleles are more likely to survive, while harmful alleles are more likely to disappear.
This Science Snack engages students in the SEP (Science and Engineering Practice) of Developing and Using Models. When you ask students to make models of meiosis, it’s important to encourage them to come up with multiple models that fit each set of data. The first few pieces of evidence can support more than one model. As each new piece of data is added, students are forced to revise their models. This creation, revision, and refutation of different models is fundamental to the modeling process, and students should learn that some explanations can and should be discarded along the way.
While this activity is designed to be carried out through drawing alone, it may be helpful to provide your students with colored construction paper, scissors, and glue or tape to enable them to create chromosome models that can be moved around and modified. Manipulatable models can help students to imagine how chromosomes might arrange themselves during the different stages of meiosis.
Before doing this activity, students should understand the cellular basis of sexual reproduction. Modeling Meiosis is intended to help students to focus on the inputs and outputs of meiosis, and to think about why sex cells are the way they are, rather than focusing on the molecular processes of meiosis. Ask students to describe precisely the differences between parent cells and sex cells, and why the features of sex cells might be important, both developmentally and evolutionarily. Once students grasp the starting and ending points of meiosis, creating more detailed physical models of some of the steps of meiosis (especially of crossing over) can help solidify their understanding of the process.
This activity is part of the Phenomenal Genome project, which was supported by the National Institute Of General Medical Sciences of the National Institutes of Health under Award Number R25GM132926. The content is solely the responsibility of the authors and does not necessarily represent the official views of the National Institutes of Health.