
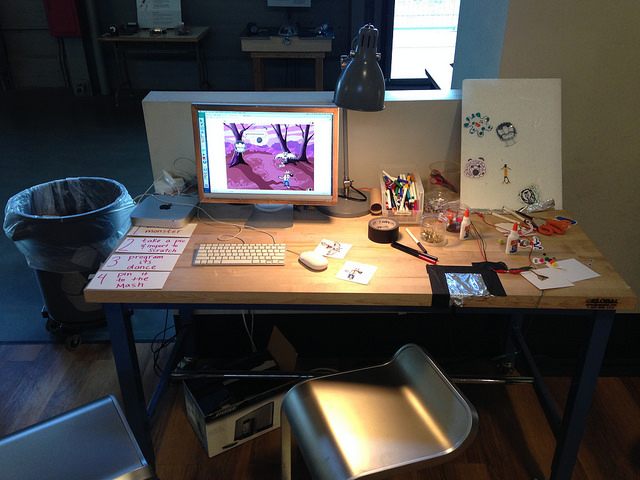
Inspired by our time with Ricarose experimenting with Scratch behind-the-scenes in the learning studio earlier in the month, we decided to create a prototype station to try with visitors on the museum floor. The first activity we decided to try is something that Ricarose showed us called "monster mash", which is a way that she's introduced Scratch to large audiences during big events.

The 'monster mash' activity provides a fun entry point into the block-based programming language where participants can draw a creature with markers and paper and then import it into Scratch. They then can program their personalized 'sprite' to dance by messing around with the motion blocks and other pieces. Once they've finished telling the monster how to groove, it joins creations made by other visitors for a collaborative dance party. There's also an option to pin the physical drawing to a board connected to a makey makey so that it triggers the dance party as well.
TS Monster Mash with Scratch from The Tinkering Studio on Vimeo.
One of the challenges with the setting up the activity was how to quickly import the drawings into Scratch so visitors could start tinkering with the programming language as soon as possible. As well, we wanted to figure out how to take photos quickly that were able to be edited so that the background would be clear.
When Ricarose showed us the system, she used her phone with dropbox and then edited the photo in photoshop before importing it to scratch. This felt a little too clunky but we didn't have a better solution, until amazingly, Luigi came by and recommended the Scannable app. This iphone app (meant for scanning receipts or business cards) can be used to automatically take a picture with a perfectly white background. The photo can then be exported to a cloud folder and imported directly to scratch. Because the background of the drawing is uniformly white, you can use the Scratch editor to quickly change the background to a transparent fill. We were ecstatic that the app helped us solve two key problems at the same time.

Sebastian and I set up a table with a computer, drawing supplies, and the board connected to a makey makey. For this first test we set up a simple workbench but this rough prototype might provide a model for a more permanent scratch station that could be used either as a facilitated activity or self-serve.

It was a slow afternoon and a little challenging to get people to try the activity, but we had a few kids try it out with us. I liked how the introduction of a few simple blocks could lead to kids naturally testing out different outcomes. Several participants told me that they wanted their sprite to move in a specific way, and since I haven't worked too much with the program, we had to figure it out together which provided nice moments of collaboration.
While Scratch can be used to make quite complicated designs, we are quite happy to present a basic exploration in the tinkering studio. It would be great if people left with the impression that they are able to use a computer as a creative tool to interact with both the digital and physical world. Additionally since Scratch is used in a lot of classrooms, it's been nice to have interactions with kids who are more expert with the interface. Already I've learned a lot from trying out Scratch in the tinkering studio which is usually one of our biggest criteria for continuing to work on a new activity.
Sebastian and I have a couple more ideas for initial scratch experiments. We are hoping to create a digital version of the settling plates exhibits where visitors can program the movements of microscopic sealife. As well we hope to continue to integrate scratch into our chain reaction workshops.