
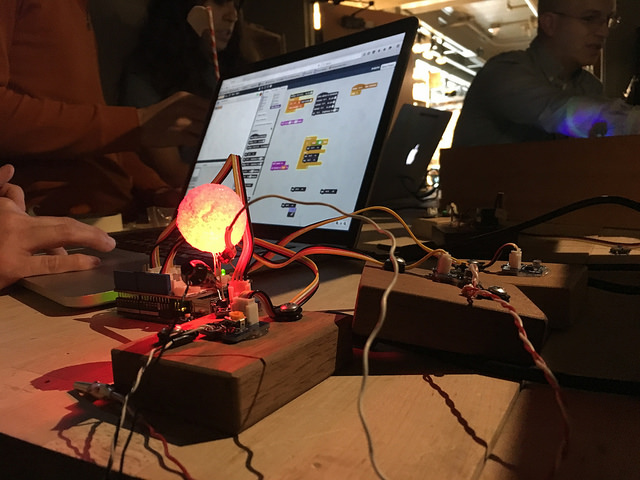
This week we've been continuing experiments inspired by the PIE sensor garden workshop using the seeed grove kit and scratch programming as entry points to the idea of computational tinkering.
 Our initial prototype of a rotating disk and super bright LEDs from light play got us thinking about ways to trigger interesting sounds, animations, and physical objects using sensors. While the patterns of lightness and darkness on the table can create repeating patterns, we also thought it would be interesting to build mechanisms that could trigger each other to create "feedback loops" with the inputs and outputs creating unusual cycles.
 A natural first step was to use LEDs and light sensors to experiment with this phenomenon. One inspiration for this idea was the "communicating night lights" prototype made by exhibit developer Charles Sowers several years ago where an array of lights and sensors responded to each other in interesting ways. In addition, some of the earliest PICO cricket projects involved intricate relationships between sensors and outputs.
 For the first experiment, Sebastian and I connected a red, greed, and blue super bright LED to the seeed relays. The relays can be controlled on scratchx as if they were LEDs and they give the ability to switch on and off components that require more power than the 5V that the arduino produces. We connected the relays to the LEDs on three digital ports and connected the light sensors to three analog ports. We pointed each light at a sensor connected to another one of the lights, creating a loop.
 Here's a video of the first test. It was really fun and unexpectedly beautiful and the clicking of the relay created an audio aspect to the exploration as well. We starting tweaking the wait times in the program and the sensitivity of the sensor which allowed different patterns to emerge. One thing that we were curious about was that we noticed the pattern would eventually fall out of snyc and end up with either all the lights on or off.

So as a test, we placed wood pieces as "blockers" in-between the lights so that they wouldn't trigger each other "accidentally" which made for some more consistent results (although we liked the bit of randomness in the initial trials). The fact that scratch can control the wait times for each of the sensors and lights made the system more customizable than the off-the-shelf parts that were part of Charles' exhibit prototype. It was fun to experiment with changing the variables in scratch as well as physically moving the pieces to create different systems. One thing that we'd also liek to try is having dozens of lights all creating complex environments of triggering each other. We'll need to make more parts for that!  One of the drawbacks of the scratch programming inputs and outputs in general is that they have constantly remain connected to the computer (normally when programming an LED you would upload the code to the board and it would be able to be untethered. One of the seeed parts that we're excited about exploring more is the DC Jack Power part which simplifies the setup but can still be connected to photoresistors and relays to make interesting flickering patterns.
 After a few initial experiments, the whole tinkering group convened for a prototyping session. I worked with Amy on a project where we connected one tricolor LED as if it was three separate LEDs (using the shared ground wire and connecting each other lead to a separate socket port on the shield. We wanted the light to change color when the sensor encountered areas of light and dark.
 It was funny, because even with the previous experience with the feedback loops, I was surprised when our program caused the light to flicker between red and blue when the sensor was in the darkness. Only after discussing with the group did we realize that the red light was triggering the sensor before moving back to blue. Depending on the distance between the LED and the sensor, we could control the effect.
 I feel that breaking things down to simple explorations of lights and light sensors could reveal some really interesting results and allow for a lot of experimentation. Programming and computational tinkering are challenging for many reasons and definitely take some time to get the hang of, so I anticipate developing several mini-explorations as possible entry points for visitors to start messing around with these ideas.